
Yさん
最近ブログ記事に吹き出しを使ってるのよく見ますよね

田中
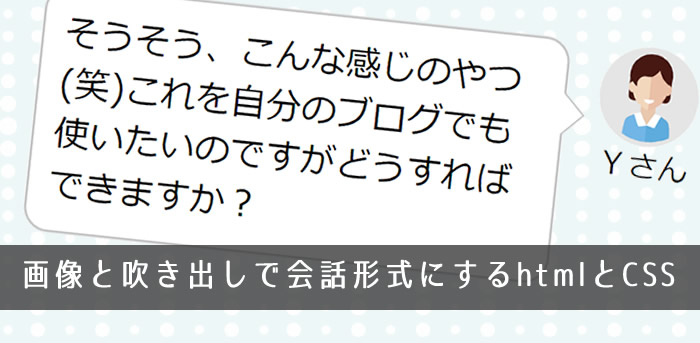
こんな感じのやつですよね。
Yさん
そうそう、こんな感じのやつ(笑)これを自分のブログでも使いたいのですがどうすればできますか?
田中
これはCSSを使ってブログの文章を装飾してるんです。
Yさん
CSSですか?難しそうですね。
田中
いえ、簡単ですよ。サンプルのCSSを一度ブログに仕込んでおけば、2回目からは会話文を書いて少し加工するだけでOKです。
Yさん
おぉそうなんですね。じゃ早速そのやり方を教えてください。
田中
はい、わかりました!
というわけで早速やってきましょう
というわけで早速やってきましょう
ふきだしの会話文章の作り方
1、画像を用意する
(1) 画像を用意する
サイズは200×200pxの正方形で自分がなるべく中心に繰る事が望ましい
質問者画像 1つ

回答者画像 1つ

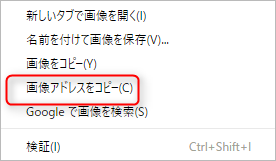
2、ご自身のホームページスペースに、画像をアップロードして置き、その画像URLを取得します。
アップロードした画像のURLは、ブラウザ上で画像の上で右クリックして「画像アドレスのコピー」で取得できます。
2、CSSをサイトに追記する
サイトにある「style.css」などのCSSファイルに以下のcssを追記します。
/*==========================================
    ふきだし
============================================*/

.arrow_answer,
.arrow_question {
    position: relative;
    background: #fff;
    border: 1px solid #c8c8c8;
    border-radius: 10px;
    width:80%;
    font-size: 14px;
    padding:3%;
}

.arrow_question {
    float: right;
}

.arrow_answer:after,
.arrow_answer:before,
.arrow_question:after,
.arrow_question:before {
    top: 30%;
    border: solid transparent;
    content: " ";
    height: 0;
    width: 0;
    position: absolute;
    pointer-events: none;
}

.arrow_question:after,
.arrow_question:before {
    right: 100%;
}

.arrow_answer:after,
.arrow_answer:before{
     left: 100%;
}

.arrow_answer:after,
.arrow_question:after {
    border-color: rgba(255, 255, 255, 0);
    border-width: 8px;
    margin-top: -8px;
}

.arrow_answer:after{
    border-left-color: #fff;
}

.arrow_question:after{
    border-right-color: #fff;

}

.arrow_answer:before,
.arrow_question:before {
    border-color: rgba(200, 200, 200, 0);
    border-width: 9px;
    margin-top: -9px;
}

.arrow_answer:before{
    border-left-color: #c8c8c8;
}

.arrow_question:before {
    border-right-color: #c8c8c8;
}

.question_image{
     float: left;
     width:15%;
}

.answer_image{
     float: right;
     width:15%;
}

.answer_image img,
.question_image img{
    border-radius: 50px;
    display: block;
    margin: 0 auto;
    max-width: 60px;
    width: 100%;
}

.question_Box .name {
    text-align: center;
    font-size: 12px;
}
.question_Box{
     width: 100%;
     overflow: hidden;
     margin-bottom: 8px;
}
.question_Box:nth-child(even){
     margin-bottom: 25px;
}
3、htmlを作る(会話文をhtmlに挿入する)
質問者用html
<div class="question_Box">
    <div class="answer_image"><img src="質問者の画像URL">
        <p class="name">
        質問者名
        </p>
    </div>
    <div class="arrow_answer">
        質問者の発言内容
    </div>
</div>
回答者用html
<div class="question_Box">
    <div class="question_image"><img src="回答者の画像URL">
        <p class="name">
        回答者名
        </p>
    </div>
    <div class="arrow_question">
        回答者の発言
    </div>
</div>
まとめ
Yさん
結構簡単にできそうですね!
田中
CSSの追記だけちょと大変だと思いますが、2回目からは、ひな形htmlに会話文章をあてはめていくだけですからね。
Yさん
会話形式だとブログ文章もすらすら書けるんですよね。
田中
そうなんですよ。説得するような文章だと力が入ってしまい、なかなか文字を書くのがつらいんですが、会話だとスラスラ書けますよね。
Yさん
それに、ちょっと難しそうな説明を書いても吹き出しだとやさしいイメージになりますよね
田中
そうなんですよ。デキる!WEBの内容も説明する文章とか多いのでちょっと固めなので、これから吹き出しを使ってやさしい感じにできたらと思っています。
Yさん
難しいとデキる!前に挫折しちゃいますからね
田中
そうですね(笑)